Honda Shadow Forums banner

Irreparably Lean: I'll try anything!!

12K views 35 replies 17 participants last post by  Inga  
#1 ·
I'm so desperate to get rid of the ______ _____ _____ popping!! I've checked, rechecked, and triple checked just about everything but I'm still running lean! I'm at my wits end and almost ready to give up, but I refuse to let this beat me. I will try anything and will probably retry everything. Your suggestions and support are most welcome.

For those of you who have been following my thread, http://www.hondashadow.net/forum/72-technical-discussion/107170-air-filters-lean-mixture.html, this is a continuation of that thread.

A quick recap of the problem/symptoms:


  • Major popcorn sounds on deceleration or when the throttle is closed while the engine is revving at high RPMs
  • Lack of power for first quarter throttle
  • White spark plugs after driving around below first quarter throttle. Almost tan plugs after driving on the highway
  • Low 30s mpg when driving around town but 50+ mpg on the highway.
  • Engine revs +2-3000 rpms when a paper towel is stuffed into air box. Adjusting idle screw to 1000 rpms produces a beautiful idling sound with very responsive throttle and no popping. However, the engine will die if driven around past 1/4 throttle...
The most obvious culprit is the pilot jets... but before you all start screaming solutions at once, please read what I've done so far.

This has actually been a problem for at least a year now. Some of you may remember my thread, http://www.hondashadow.net/forum/72...echnical-discussion/94574-new-rider-old-bike-soon-ether-junkie-choke-cable.html. The choke cable was crimped causing the choke valve to rust open. In addition, or maybe related, my gas tanks were completely rusted. Needless to say the carbs and engine were flooded with rusty gas. This is how I unknowingly bought the bike. When I replaced the choke cable and was finally able to close the enrichment circuit, the bike has run lean ever since.

A quick recap of tests and attempted solutions:


  • Acid etched both gas tanks and lined with POR15 to remove and prevent rusting
  • Replaced all fuel lines and gas filter (Auto zone brand/not OEM)
  • Rebuilt Carbs: Completely disassembled carbs and dipped into Berryman's Chem dip for at least 24 hours - each carb separately. Cleaned varnish and rust particulate with metal brushes and guitar wire. Sprayed all ports with compressed air in a can. Replaced all o rings and gaskets with Honda gasket kit. (Pilot screws were left in carbs for cleaning because one couldn't be removed at first, http://www.hondashadow.net/forum/72-technical-discussion/95160-pilot-screws-jet-needles.html. Past owner was a real jerk apparently)
  • Second Carb cleaning: professionally tapped out broken pilot screw and redipped in chem dip. Returned float level and pilot screws to factory settings.
  • Built manometer and synced carbs
  • Adjust screws to +1 from factory setting (~4 turns)
  • Replaced Spark plugs and gapped to spec
  • Tested all plugs for spark
  • Added Berryman's B12 over 3 gas tanks
  • Tested for air leaks with can of ether and repaired: Found some minor leaks around rubber boots above carbs and the airbox. Removed rubber boots from air connecting tube (a.k.a. the snorkel). It was very dirty with failing sealant. It was unknown if the the sealant was from past owner or factory. Cleaned away and replaced with only a little bit of oil. No one seemed to know if sealant was necessary in the thread: http://www.hondashadow.net/forum/72-technical-discussion/108397-rubber-boots-sealant.html. Also cleaned similar grime/oil/dirt/sealant from elbow and rubber boot where the crank case breather hose passes through air box. Also found same stuff on rubber boot where air connecting tube meets the air box. No sign of air leaks after cleaning when testing with a can of ether at idle. Still wondering if the sealant is necessary to prevent leaks at higher rpms.
  • Replaced copper gasket at exhaust port and tightened to spec torque
  • Cleaned OEM air filter and reoiled using 90wt gear oil as per shop manual
  • Replaced air filter with UNI foam filter and oiled with uni foam oil
  • Replaced spark plugs once again. (Broke one and decided to replace them all: http://www.hondashadow.net/forum/72-technical-discussion/107215-reusing-used-spark-plugs.html)
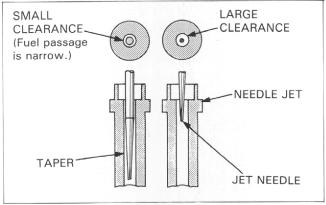
  • Cleaned carbs for third time: Removed carbs and all jets, needles, plugs, screws and diaphragms but left carbs connected (synced). Dipped in 80/20 pine sol/water for two days. Checked every 12 hours or so to spray all circuits from all ends with 80 psi of air and then sprayed with acetone. No real signs of varnish or clogs (good spray of acetone from exit points). Passed guitar string where possible. Rinsed with hot water before returned to pin sol bath. Repeated 3 or 4 times. Polished jet needle (which was pretty worn on one side) with brasso until smooth. Polished float seats with brasso. Rebuilt carbs and returned float level and pilot screws to factory settings.
  • Checked for leaks with can of ether
  • +1 turn of pilot screws from factory settings (~4 turns total)
  • Checked fuel pump flow rate: 117 cc in 13 seconds (~540 cc per minute) Spec is 614 cc per min +/- 10%... which puts me right on the low end
  • Readjusted raised float levels to be rich (adjusted from 7.5mm spec to 6.5mm)
  • Lightly sanded plastic carb slide with 1000+ grit paper (I dunno... getting desperate)
  • Rechecked for leaks with ether
  • Replaced stock 40 pilot jets with size 42s
  • Rechecked for leaks with ether
  • 1/3 can of Berryman's b12 in 2.5 gallons of gas in fuel tank.
That's pretty much a chronological account of everything I've done up until now. Nothing has worked so far. There were only minor, short-lived improvements. Increasing the jet sizes seemed to make the biggest improvement in power, but the popping still persists like crazy. I'll end this post here and edit the symptoms and add attempted solutions here as I notice/perform them. This way new readers will be more or less up to date by the first post.

Thank you in advance for everyone's input no matter how big or how small. I'll try anything!!
 
#3 ·
No such thing as a stupid question in this thread. The pilot screws have been removed and reinserted with the second and third carb cleanings. The screw was fitted with the spring, the washer, and a new o ring in that order so that the o ring was closest to the needle tip of screw and first to enter the hole.

Each time they were first adjusted to the factory setting of 2.75 turns from seated (not tight) and then adjusted to +1 turn (3.75 turns total). I have since turned it out to +4 turns from seated but have yet to brave anything past that limit.
 
#4 · (Edited)
Have you done a cylinder pressure leak-down test yet? Maybe a burned valve? Are your valves adjusted correctly? Did you seal the airbox joint at the intake tube? Any cracks in the rubber on ANY boots? Are you CERTAIN there are no rust particles lodged in any of the carb ports?
 
#10 ·
I have not done a cylinder pressure leak-down test yet. I also need to do a compression check too. I have been thinking about doing these tests as I have oil leaking around the cylinder head (maybe this should go in my symptoms list). I understand this would cause a loss in power, but how would a leaky valve or piston rings explain only a loss in the first quarter throttle and white spark plugs? How does this lean out the mixture? Can anyone tell me how to arrange the piston so that it is at Top Dead Center? My manual just says put piston at TDC and nothing more.

I have self-adjusting valves, but I have not wanted to pull the engine and so I haven't checked them yet. It seems I might have to do this if I'm going to solve this mystery.

I cleaned all the joints on both sides of all rubber boots including the one between the air tube and air box. The rubber was not dry or cracked. I stretched them all looking for imperfections. If you mean seal as in added a bit of oil and clamped down the clean boots with OEM clamps, then yes. If you are asking if I added sealant, the answer is no. I would gladly go buy some sealant if someone would tell me what is supposed to used. I tried gasket sealant but that just made a mess and I cleaned it up. It appears that there was some type of sealant between boot joints that are rarely disturbed (i.e. between airbox and boot leading to air tube, between air tube and boots leading to carbs, and boot for breather tube that passes through air box).

I'm as certain my carbs are clean as anyone who has cleaned their carbs 3 separate times as I have detailed above. However, I bought a can of spray carb cleaner with nastier solvents than just acetone (i.e. xylene). I will try a fourth time probably this weekend and let loose all of **** on that pilot jet circuit!!
 
#5 ·
I'm usually wrong when I chime in on these things, but... adjust the floats to run the bowl levels a little higher? That should richen it up a bit...

Ah, dang it. Just re-read, and saw you already did that. Sorry.
 
#11 · (Edited)
I sprayed ether just about everywhere. Intake manifold (air tube/snorkel) boots were included. The main jets would not affect the first quarter throttle so much as 3/4 to full throttle. My full throttle seems to run fine and plugs turn tannish after a ride in that range. I'm pretty happy with 50+ highway mpg

Edit: I found this cool picture that illustrates the jets and their intended throttle ranges
Image


verdeva said:
I think your best clue is what happens with the paper towel. It sounds like you are running rich at idle to compensate for the mid range band. Mid range is controlled by the slider needles.
No. Adding a paper towel restricts the air flow thereby enrichening the mixture. This test is congruent with all other symptoms that I'm running lean at idle.

Regardless, I did buy some carb spray and will try your technique probably this weekend. Thanks for the input
 
#7 ·
I think your best clue is what happens with the paper towel. It sounds like you are running rich at idle to compensate for the mid range band. Mid range is controlled by the slider needles.

I had a similar situation with my Sabre. I found that I had crud in the needle holder, even though I had pine sol soaked and cleaned my carbs numerous times. I have seen pictures that some carbs allow this holder to be tapped out with a driver from the bowl side, but I am not sure if our carbs can remove this part. What fixed my cab was deep cleaning with carb spray. I used golf tee's to plug this hole where the needle slider fits and soaked the spray from the bowl side. After 30 min, I hit this with lots of compressed air. I actually saw some crud come out! I repeated this soaking two more times. When you get the carb reassembled, make sure that the slider pistons move very freely with the same suction in each side. I hope this helps. - Dave
 
#8 ·
Mine was running lean and bogging down undriveably(if that's a word). I rebuilt the carb 3 times and never could get it fixed. Thankfully my bike has one carb instead of 2 like yours and I bit the bullet and bought a brand new carb and no problems since. It ran like brand new after that. My plugs were also turning a grayish white.
 
#13 ·
Polished jet needle (which was pretty worn on one side) with brasso until smooth. Polished float seats with brasso.
  • Lightly sanded plastic carb slide with 1000+ grit paper (I dunno... getting desperate)

Thank you in advance for everyone's input no matter how big or how small. I'll try anything!!
These two things pop out.
When you sanded the slides, you did make sure they were not binding. And that the diaphragm is un damaged.
Are the needles stock? Did the shims get put back correctly? Are the main jets stock? Is the exhaust stock? The Uni filter is hiflowing this can cause lean condition? Polishing the needle makes it smaller in diameter, this allows it to seat further down into the jet, this causes a leaner AF mixture, at all lower throttle settings. Maybe try different heat range plugs. You might be fighting the alchohol in the gas not the bike. Could also try the next size up from the 42 jet.
 
#14 ·
Slides are not binding and diaphragm is undamaged. Needles are stock which have no shims. Main jets and exhaust are stock. Uni Filter is not advertised as high flowing. It seems very similar to the foam of the OEM filter. If it allows for more throughput, it is slight. Many people have reported using this filter with no need to adjust A/F mix. I could try putting my old OEM filter back on.

Polishing the needles does make it smaller in diameter, but it does not affect where it seats inside the jet. The plastic slide/diaphragm piece which holds the jet needle is held into place by the carb body. This plastic slide piece does not allow the jet needle to fully seat into the jet even when fully rested against carb body. In other words, the jet needle ideally should never touch the jet and there will always be some small clearance even when the jet is at maximum insertion. Here's a picture to illustrate:


Polishing should increase the clearance at any position and allow for more gas flow...

I plan to change idle jets to 45's just to see if I can get it to run rich.

Thanks again for your input. The dialogue is helping me think through this problem.
 
#15 ·
(from thread: http://www.hondashadow.net/forum/72-technical-discussion/107170-air-filters-lean-mixture-3.html)
Dan, Sorry if this has already been brought up but.. I see that you are from California. By chance was the bike equipped with a Ca. emissions system, and if so, was it removed?

Also, Is the gas you are using a mix of gas and alcohol? (E-85) If you are using the alcohol mix, it may require a richer mixture for proper combustion. ie, larger jets, wider needle setting etc. Alcohol produces 1/3 less energy than gasoline.
Yes it is in fact. Most useless piece of junk if you ask me. Dealer once told me to just "just junk the useless extra 15 lbs", but that he'd deny ever saying it if I told anyone. I haven't done this yet as I'd like to get the bike running right first. I've checked all of these connections and there doesn't seem to be any problems there. You think this could be adding too much air too my system? Maybe I should try plugging the holes. What do you suggest?

I don't know much about E85. I fill up at my local Shell station usually with 87 octane. There is a sticker that says "this gas may contain up to 10% ethanol" next to the pump. I thought that all gas stations do that though.
 
#16 ·
I don't know much about the pollution controls specifically. If you had removed it, it would be a issue in the carb mixture. Others who have removed the controls may be able to offer insight. From what I have read, it can't just be disconnected w/o other changes.

As far as the alcohol in the gas, yes, it's all over. The thing is that when the bike was made, it wasn't in use.
(As far as I know.) Gas has since been altered quite a bit. Ca. has more changes than other states.
Ethanol as a Transportation Fuel
Other Ca. forum members may know more.
 
#17 ·
Oh my god, just put a Dyna jet kit in it, they have different taper needles, better emulsion tubes to match them, and it gets your bike off lean epa mixtures(but disclaimer off road use)yeah right. If you haven't done an airbox mod, with their needle, and your pilot jet, you should be able to get it dialed in without replacing the pilot jet. Factory carbs., just suck period.
 
#19 ·
+1 for ultrasonic cleaning. I've thought about sneaking my carbs into my lab and using the sonicator for the dissection tools. I just don't think they'd fit.


Didn't have time to clean the carbs again this weekend, but all things point to the pilot jet circuit being dirty. Looking at some cutaways shows me lots a little passages with 90 degree angles to get clogged. There are more exit holes than I originally thought too.

I am very grateful to Verdeva for sending me his extra set of 45 pilot jets. I received them in the mail yesterday, so I can change those too. Ill get this thing running rich yet.
 
#21 ·
Hi everyone. I know it's been almost a year since I started this post, but I wanted to give an update.

I finally broke down and bought an ultrasonic cleaner this weekend. It is a Chicago Electric from Harbor Freight. It reaches 42,000 hz at 160watts from one transducer. It holds about 2.5 L. I did a lot of shopping around it for an affordable one that wouldn't be a waste of money for lack of power. It was either this one for $75 or a 9L 250 watt with four transducers for $350. As much as I wanted the bigger one, I just couldn't bring myself to spend that kind of money. Heh almost built my own using a power sander, but I don't think they get passed 20,000 hz.

Anywho, I tore apart my carbs again and sprayed all the jets and passages with carb cleaner (Gum out). Then I let it soak in Berryman's dip for about 30 minutes while I prepared a heated water bath with about 50/50 pin-sol in my new ultrasonic cleaner. I threw in about a table spoon of dish soap for extra surfactant. Once the water reached about 150deg F I plopped my carb in there and turned on the sonicator. It only lasts 8 min in the longest cycle so I'd turn it a little bit and restart the cycle every so often. Each time I would spray all the passages with 150 psi and then carb spray. I was busy eating pizza and watch the Blue's Brothers, but I probably did this for about an hour. Meanwhile I had the second carb in the chem dip following up with the same process. I re-dipped the first carb once the second one went into the sonicator. Both carbs got equal treatment like this.

At some point the carb spray was coming out of all ports with strong mist of toxic chemicals and I called it quits. I rinsed off everything and then blew everything dry with 80-150 psi. I then let everything dry overnight.

This morning I put everything back together and exchanged my size 42 pilot jets for size 45 (thanks VERDEVA!!). Yes I'm really going all out on these carbs.

Well I put everything back on the bike and she started right up after the carbs had filled. It definitely runs better, but not as good as I expected it. I think I can finally eliminate the carbs as the culprit though. The bike still likes having a paper towel in the airbox (increases RPM at idle). However unlike before it isn't super responsive to the throttle. Before, it would rev high and come back quick with the towel in place. Now it cuts out with the throttle and the towel in place....

Confusing but I did a few tests of which I will write in my next reply...
 
#22 ·
Okay so despite the fact that I perfectly synced the carbs by eyeballing the butterfly valve over the pilot jet pin holes, the manometer showed that the cylinders were extremely off-balance. Usually I'm pretty close and only have to fine tune it. This time I had to quickly shut off the bike, but not before I sucked fluid into the cylinders. Several turns later on the linkage, and I had the carbs "synced". However, once I balanced the pressure in each cylinder, the RPMs at idle came down a bit. I have a feeling that I've got a major leak somewhere in the cylinder heads.

Honestly I've been leaking oil like the valdese for a couple of months. This might have been the problem all along, I just wasn't noticing the oil so much before.

So with the cylinders balanced, I believe my carbs are actually way out of sync and now I'm running one cylinder lean and the other rich! hah. I tested this by pulling the hoses from the manometer off of the nipples leading to each cylinder. The front cylinder will kill the bike unless I plug the hole with my finger. The back cylinder doesn't seem to care. I richened the mix on the front side with the pilot screw out to four turns. The back cylinder starts to pop a ton at 4 turns, but it stops at 2.5 turns.

Right now I have the front adjusted to 4 turns and the back adjusted to 2.5. I know that's a huge faux pas, but the bike seems to run the best here.

I believe the next step is to replace all the seals in the engine. The bike isn't going to be right if one cylinder has a different compression than the other. I just thought that I might have a loose boot or something after the reinstall, so I'll probably do another pass with the ether tomorrow just to see if I missed something obvious. Otherwise time to tear down and rebuild. It's been a long time coming.

This was more or less an update, but please feel free to chime in with comments or suggestions.
 
#23 ·
I've just read this thread and can only make a suggestion that seems almost worthless in the face of all the work you have done..

Running lean is a result of too much air or too little fuel..

You lined the tanks with POR15 has this restricted the gas flow..

and you have the EECS setup which has hundreds of hoses with hose clips connected from the carbs to the combustion chamber, too much air entering through this system could cause the same sort of problems as loose carb mounting boots which is high revs at tickover and when you let go of the throttle the revs don't die back to tickover very quickly...

I feel humbled by your dedication, I would have sold the bike on as a project long ago.

John.
 
#24 ·
I've just read this thread and can only make a suggestion that seems almost worthless in the face of all the work you have done.

...

I feel humbled by your dedication, I would have sold the bike on as a project long ago.

John.
Thank you John for admiring my thickheaded, unwillingness to accept that this bike is a waste. It is the only thing of which I can be proud (?). :p Seriously I have wasted too much money and time on this project bike, but I keep on in the name of learning something. I view it more or less as entertainment value of an expensive hobby plus I am learning a lot.

Running lean is a result of too much air or too little fuel..

You lined the tanks with POR15 has this restricted the gas flow..
That's a good idea, but I did test the fuel pump flow rate as one of my tests. It was a little slow but within the +/- 10% spec.

and you have the EECS setup which has hundreds of hoses with hose clips connected from the carbs to the combustion chamber, too much air entering through this system could cause the same sort of problems as loose carb mounting boots which is high revs at tickover and when you let go of the throttle the revs don't die back to tickover very quickly...
I have been meaning to remove all that extra junk. I think I will try that before I rebuild the engine. Shouldn't take too much time. Wouldn't that be worth discovering if it was the problem!

I need to look at my diagrams and see what is important to keep and what can be plugged. I know there is a port on the bottom of one of the carbs - I wonder if it is the leaner front carb - which has a hose leading from the EECS. There are some vacuum hoses up top that I believe also connect to the EECS circuit, but I think they are also important for normal functioning of the carbs. If someone knows anything about what to remove and what to keep, please chime in.
 
#27 ·
That's the type of advice I need to hear. I'm largely figuring out all of this one on my own with no experience behind my belt. Feels like I'm grabbing at straws in the dark sometimes. Although I'd like to think that my guesses are somewhat educated (thank you internet/thank you members of hondashadow.net).

Tell me more. Do you have a specific example where the oil leaks messed with the air/fuel mix?

I guess it makes sense that an oil leak could also allow air into the cylinder without drawing gas from the carbs. Or the leaks could be the result of overheating which could have also burned the valves. Leaky exhaust valves would draw air in from the exhaust leaning the mixture. Sorry if this is obvious to anyone. I'm just trying to talk myself through it.
 
#28 ·
I was also going to suggest shimming up the jet needles -- you may be able to do that even though you don't have the c-clip adjustable kind. I shimmed up the Mikunis on my old GV1200 by putting very tiny washers INSIDE the slides where the needles protruded through the hole in the bottom. You'll see what I mean. Since I no longer have a Shadow I'm not sure this will work on your particular carbs, but....

And if that doesn't do it...valves?
 
#30 ·
I'm following your thread, as we are having the same problem with my 84 VT700c.
We have already pulled the engine, resealing and fixing the leaks this winter. We also added another fuel pump (not stock) that was within the specifications. Before pulling the engine & replacing the pump I did not have the hesitation under load. Now I do. We have also taken it to a shop and had the carbs rebuilt, knowing this needed to be done anyway. Adjusted to stock timing, & the shop tunning the carbs the hesitation up top under load continues. Only, adjusted properly we have a problem starting as well. It's like it's to lean. & when you adjust for more fuel in the idle ratio we get the pop backfire on release of throttle (at idle rev and while ridding) but it fixes the start up problem. The shop is convinced it's because the fuel pump is not the stock pump. From what they are telling us the stock pump will continuously pump the exact pressure through the lines to complete the fuel ratio. We've ordered the stock pump (although pricey) and are waiting for it to arrive. If this alone fixes the problem it will be well worth it! I'll post the results after the pump switch & share the info.


Sent from my DROIDX using Motorcycle.com Free App
 
#31 ·
Ok, Definitely did not fix the problem with the stock pump. (Cool thing about the shop is they didn't charge us for it and left it on the bike, and refunded an hour of labor off the carb rebuild. They did give up on it tho.) Next, back to the manual and testing everything possible. I'll be following your thread.
 
#32 ·
Thanks for joining me on this problem. Wow that's saying something when the shop gives up on you.

The fact that they took an hour of labor off the carb rebuild makes me wonder how confident they were on the rebuild. I've taken mine apart so many times that i can have the thing removed and disassembled in about 15 minutes. You might want to take yours apart and verify that all of the ports are showing steady streams of outflow when you spray each jet. Check the diagrams I posted earlier to know which ports to watch (but with goggles and a mask if it's with carb spray).

Have you done a leak-down test on your rebuilt engine? The tool costs about $60 plus you need an air compressor. I think you can buy parts to build your own for even cheaper. Basically you fill the cylinders with air to a certain psi and a separate gauge monitors how well the cylinder maintains that pressure. You'll have to put the pistons in the TDC (someone correct me if I'm wrong) when both valves are closed just before ignition. Only then you will know if the engine rebuild was effective. I've heard that a skilled mechanic with a trained ear can pinpoint an air leak this way (exhaust valves, intake valves, piston rings or head gasket).

I've learned not to trust any work that was "said" to be done until I see the results with my own eyes. Just because something was rebuilt doesn't mean it was done right!

I'm hoping to buy the gasket kit for my rebuild soon. I don't want to stop riding to rebuild though :(
 
#33 ·
Clutching at straws here..I know you have removed and cleaned the carbs umpteen times already, so don't take this as sarcasm..did you clean or replace the float seat filter, it should be part of the repair kit.

John.
 
#35 · (Edited)
#36 ·
Hi Science.Dan

I just found this thread last night and hope I'm not too late to join it.
(Among others) I have a 1984 VT700c. I am the second owner and know just about all of it's history (having been closely associated with the first owner as of Spring 1985).
My bike has always lived in dry garages in Michigan. It has had straight pipes since the first day I saw it. The carbs never needed to be modified in order to accomodate the aftermarket pipes - it ran beautifully. As a matter of fact, it ran well enough that its first owner was able to do 1/4 mile long wheelies with it.
It has always been a reliable starter and runner.

The worst that happened to it was that I gifted it to my Dad, who only rode it twice and then parked it in the garage. It was never started for more than 5 years.
When I got it back (being a relative beginner with motorcycles) I got it running with starter fluid and tried to smooth it out by revving the throttle (until I noticed the pipe on the right side glowing).
I took it to a genius Honda mechanic who cleaned the carbs (he NEVER touched the pilot jets, or split the carbs from one another. He never drilled out the other caps either.

The bike started and ran beautifully after his thorough carb clean.
I rode the bike for 2 years with no trouble what-so-ever, then moved away and the poor bike was left to sit (unstarted) another few years.
This time, under long-distance guidence from my mechanic (Greg Phillips - if any body knows him or what happened to him) I tore the carbs down my self.
It was a success. The bike started just as before and ran well and strong. The only difference was that it now had a hesitation in the throttle (a cut-out really) if I revved it to much when it was still not warmed up. (No big deal.)
My mechanic laughed at me and told me that I had simply missed a very tiny hole (something about the choke) down in the corner that I should have shoved an immensely small wire into to clean out. I tucked that info into my memory for future use as I did not want to take the carbs off again so soon.
He said to run the bike with the choke just a little on (until it was very warmed up) and that would solve the problem while I rode (until I could take it apart and fix it properly). He was right.
With the choke on, there was no cut-out; when the bike was totally warmed up (a few miles down the road), it had no problems either.

Then... after a few more years... I noticed it seemed to sputter. Time for a tune-up? New spark plugs, fuel filter, oil and filter, air filter.
But my original air filter had disintigrated! There was nothing but bits of it all over the inside of the air box.
I cleaned it out as best I could, gave it a new UNI air filter and the bike ran fine again. I rode it almost daily all year as long as the temperature was above 42F.
In 2007 I replaced a leaking float bowl seal (on-bike repair).
In 2008 I rode all the way to Americade and back (long route both ways) without a single hick-up. It had been back-firing some times (especially when I goofed around with the throttle to make noise under over-passes).
The bike had been weeping a little oil around some places at the heads, nothing bad (not enough to drip - just enough to make the engine dirty). That weeping got worse with time and turned into little runs. I still wasn't worried.

In 2009 I aquired a 1987 Super Magna, and so the poor little Shadow was once again relegated to the back corner of the garage. It was started about once a month and let idle until warm.
This year I put "historical" plates on it and wanted to pull it out of mothballs to run in a local vintage vehicle event.
It started fine, as usual, and so I rode it down the road 15 miles to work out the cobwebs.
It didn't run well. It sputtered and bucked and back fired and I got what I hear other people describe as a "pop-corn" sound every time I let off the throttle (both suddenly and slowly).

I just cleaned the carbs - blowing out all the passages. I got good spray-out every time I blasted into any hole. There was no "varnish" in there; just a little residue (which washed right off with a blast of carb cleaner) and what looked to be some tiny black remains from that old disintegrated filter from so many years ago.
I was considering putting new float needles in it, but they would take 4 days to get here so I decided to see how it would run with the old ones.
I put the carb back on (w/out the main gas tank - running it from the reserve tank, instead), and it started up fine and strong. But....... I still have that same old cut-out and the pop-corning - although the pop-corning is not as bad; especially when it really warmed up.
I thought to my self that I must not have found those tiny little holes my mechanic from so many years ago had told me about. I let it run for a little while - reading my Clymer's and deciding whether or not to try another cleaning and give it new float needles.
I found (like you) it ran better with my hand tucked into the air box.
I then gave it some throttle and let it run at something like 2000 rpm for a little while (while reading my Clymer) and when I looked down I noticed the pipes were both glowing! I shut it down fast.
It has never run so hot before! This is new!
I have to admit, as I was planning to take the carb back off, I did not tighten down the screws on the clamps for the air intake, nor on the boots. After having read your thread, I am guessing this was enough air to make it run hot.

My reason for adding to this thread was to find out how your battle is going and to tell you my straight pipes were never a problem for the original settings or jetting on the carbs. I also wanted to throw in what my long ago mechanic told me about that one little hole I missed in cleaning the carb. (Evidently it is quite a common problem, and made him laugh that so many people missed it when he didn't! I know this guy moved to Florida and then I lost track of him, so if anybody knows a BSA enthusiast, who is a great bike mechanic,originally from Michigan, ask him about carb cleaning! :) )

So now, after having read your thread, I'm suspecting my problems started with over-heating it after that first time it sat. Then, the oil leak has been making it worse. And, I looked through the hole into the front head and noticed the valve (and the passage) is all "crudded" up. The valve really looks like it is coated with barnacles! - it's that bad.
But the bike certainly runs well enough to go for a ride. I think I'll do a compression check on it tomorrow. After that I'll tighten down all the screws and clamps, ride it to the Woodward Cruise, and wait for the head-gaskets (to fix the leaks) and new float needles.
Hopefully I'll have heard an update and continuation of this thread from you before I start tearing things apart.