
OK.. so there's the deal. I've done the paint job, but if I'm having a REALLY HARD TIME WAITING FOR IT TO DRY BEFORE I REMOVE THE MASKING TAPE so here I am trying to distract myself..
So this will either be:
a) A great way to DIY whitewall your tires or
b) How NOT to whitewall your tires
Since I read the Aced-It thread and saw that he painted his tires I've been thinking I should try it. I need a new rear, but the tread on the front is really good, so best case scenario I'm making a tire that I would replace with a whitewall great, and worst case scenario I'm trashing a tire that I would replace with a whitewall. Can't loose.
Aced-it brushed on an Elastomatic (sp?) paint (right Ace?) which research showed to be a kind of roofing paint, but I can only find it locally by the gallon for $60 so .. eh.
I've read around the hot-rod forums and what I found about DIY whitewalls is:
- roofing paint works great
- roofing paint doesn't work at all
- whitewall paint works great
- whitewall paint doesn't work at all
- krylon paint works great
- krylon paint doesn't work at all
So, I reckon the real truth is:
- if you get the prep right it works great no matter what paint you use
- if you get the prep wrong it sucks no matter what paint you use
I always create a better result with a spray than a brush, so I'm going with Krylon. I decided to do all this ON the bike with the front lifted so I can spin the wheel and spray from whatever angle I want.
So, here's the way I did it.. and in a few hours I'll be able to post results of the edging, and by end of day tomorrow I'll be able to post what happens after 200 miles.
Materials:
- Frogtape Masking tape (from ACE Hardware) because it claims to contain pixie dust that reacts to paint and creates a really good edge.
- Krylon Fusion Satin White (Paint Code 2420)
- 5Star 5900 Automotive wax and grease remover
- wire wool.
1) Picked off all the dumb little spikey moulding bits of rubber because they would get in the way of masking tape
2) Washed with soap and water
3) Degreased with 5Star (I'm told that scuffing surfaces can push grease deeper)
4) Rubbed down with wire wool to create a bit of a key. I didn't go at it with a drill attachment or anything because I know I wouldn't get consistency up to the rim and edge line, so fingers crossed what I did is enough.
5) Washed with soam and water again
6) Degreased again
7) Masked the inner rim. This was pretty easy.. just ran my thumbnail along the tape and turned the wheel pushing the edge into the channel between the rim and tire. This leaves the tape sticking up in the air as you can see in the photo below.. which is perfect.. I cut a circle of plastic, and stuck it to the inside of the tape. That was easy and tidy.
![Image]()
![Image]()
.. and now I want black solid rims.. that looks bad ass.
8) After much photoshopping I decided on how wide I wanted the whitewall. I spun the wheel with a pair of scissors against the tire to create an edge line i could follow with the tape.
![Image]()
9) I sliced in to the tape like this so it I could get the curve nicer. In the end, I had to smooth out the line somewhat anyway with small bits of tape, and in hindsight making a cut ever 3/4 inch would have been optimal for ease and good curveability.
![Image]()
First side done!
![Image]()
Second Side Done!
![Image]()
.. leaving a nice series of tabs of tape
![Image]()
10) Laid a strip of plastic on the tire tread, folded in the tabs and went round again with tape to close up all the gaps.
![Image]()
READY TO GO.
11) First coat. Spun the wheel slowly and went pretty light all around on both sides.
![Image]()
Let it dry for 5 minutes then did the same again.
Let it dry for 5 minutes then did the same again.
Let it dry 15 minutes then did a more systematic thorough coat
Let it dry 15 minutes did the same again
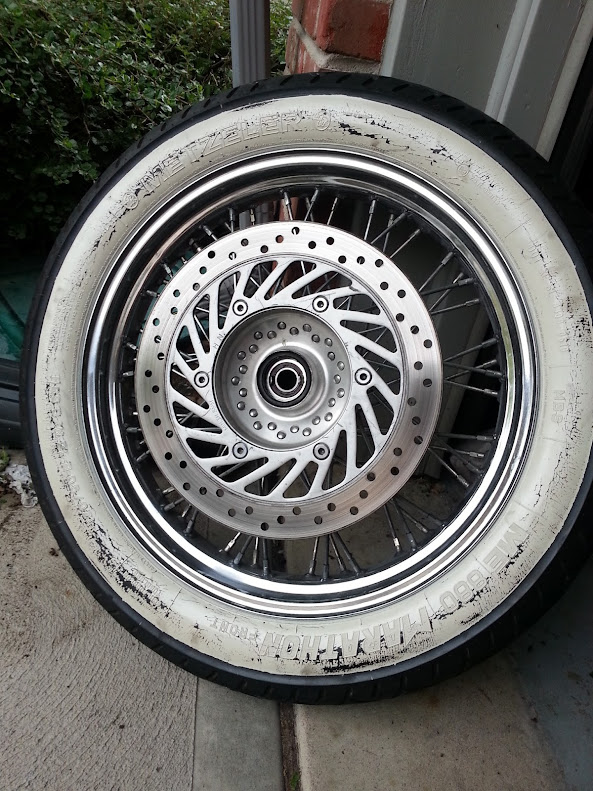
Let it dry 1 hour, dropped it off the jack and rolled it outside.
![Image]()
Is it going to be awesome????
I DON'T BLOODY KNOW and it's driving me insane. I have a terrible habit of spoiling really good paint jobs by not waiting long enough before removing the masking and then not waiting long enough to reassemble..
More soon.
K
So this will either be:
a) A great way to DIY whitewall your tires or
b) How NOT to whitewall your tires
Since I read the Aced-It thread and saw that he painted his tires I've been thinking I should try it. I need a new rear, but the tread on the front is really good, so best case scenario I'm making a tire that I would replace with a whitewall great, and worst case scenario I'm trashing a tire that I would replace with a whitewall. Can't loose.
Aced-it brushed on an Elastomatic (sp?) paint (right Ace?) which research showed to be a kind of roofing paint, but I can only find it locally by the gallon for $60 so .. eh.
I've read around the hot-rod forums and what I found about DIY whitewalls is:
- roofing paint works great
- roofing paint doesn't work at all
- whitewall paint works great
- whitewall paint doesn't work at all
- krylon paint works great
- krylon paint doesn't work at all
So, I reckon the real truth is:
- if you get the prep right it works great no matter what paint you use
- if you get the prep wrong it sucks no matter what paint you use
I always create a better result with a spray than a brush, so I'm going with Krylon. I decided to do all this ON the bike with the front lifted so I can spin the wheel and spray from whatever angle I want.
So, here's the way I did it.. and in a few hours I'll be able to post results of the edging, and by end of day tomorrow I'll be able to post what happens after 200 miles.
Materials:
- Frogtape Masking tape (from ACE Hardware) because it claims to contain pixie dust that reacts to paint and creates a really good edge.
- Krylon Fusion Satin White (Paint Code 2420)
- 5Star 5900 Automotive wax and grease remover
- wire wool.
1) Picked off all the dumb little spikey moulding bits of rubber because they would get in the way of masking tape
2) Washed with soap and water
3) Degreased with 5Star (I'm told that scuffing surfaces can push grease deeper)
4) Rubbed down with wire wool to create a bit of a key. I didn't go at it with a drill attachment or anything because I know I wouldn't get consistency up to the rim and edge line, so fingers crossed what I did is enough.
5) Washed with soam and water again
6) Degreased again
7) Masked the inner rim. This was pretty easy.. just ran my thumbnail along the tape and turned the wheel pushing the edge into the channel between the rim and tire. This leaves the tape sticking up in the air as you can see in the photo below.. which is perfect.. I cut a circle of plastic, and stuck it to the inside of the tape. That was easy and tidy.


.. and now I want black solid rims.. that looks bad ass.
8) After much photoshopping I decided on how wide I wanted the whitewall. I spun the wheel with a pair of scissors against the tire to create an edge line i could follow with the tape.

9) I sliced in to the tape like this so it I could get the curve nicer. In the end, I had to smooth out the line somewhat anyway with small bits of tape, and in hindsight making a cut ever 3/4 inch would have been optimal for ease and good curveability.

First side done!

Second Side Done!

.. leaving a nice series of tabs of tape

10) Laid a strip of plastic on the tire tread, folded in the tabs and went round again with tape to close up all the gaps.

READY TO GO.
11) First coat. Spun the wheel slowly and went pretty light all around on both sides.

Let it dry for 5 minutes then did the same again.
Let it dry for 5 minutes then did the same again.
Let it dry 15 minutes then did a more systematic thorough coat
Let it dry 15 minutes did the same again
Let it dry 1 hour, dropped it off the jack and rolled it outside.

Is it going to be awesome????
I DON'T BLOODY KNOW and it's driving me insane. I have a terrible habit of spoiling really good paint jobs by not waiting long enough before removing the masking and then not waiting long enough to reassemble..
More soon.
K