I have converted a 2009 VT750C2 Shadow's rear turn signals to also include running lights. I changed the single pole contact to a double and wired the extra lead into the license plate light. I inserted a two wire bulb into the mounting plate and filed off the extra peg so as to not alter the mounting plate. All seems to be working well, but I'm curious if there may be any advice on something I don't know. The whole conversion cost about $11.00 from Pep Boys. I wrote up the procedure with photos if anyone is interested.
Dunc

VT750C2 Shadow Turn/Tail Lights Conv.
Dunc
Discussion starter
30 posts
·
Joined 2011
- Add to quote Only show this user
I have converted a 2009 VT750C2 Shadow's rear turn signals to also include running lights. I changed the single pole contact to a double and wired the extra lead into the license plate light. I inserted a two wire bulb into the mounting plate and filed off the extra peg so as to not alter the mounting plate. All seems to be working well, but I'm curious if there may be any advice on something I don't know. The whole conversion cost about $11.00 from Pep Boys. I wrote up the procedure with photos if anyone is interested.
10 posts
·
Joined 2011
i would like to see this to and talk to others who have done it
do i need to switch my lenses to red for running lights? or clear with red bulbs ?
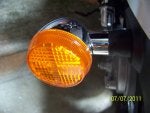
my 04 shadow sabre has amber turn signals
do i need to switch my lenses to red for running lights? or clear with red bulbs ?
my 04 shadow sabre has amber turn signals
Dunc
Discussion starter
30 posts
·
Joined 2011
Tail light Conversion
I'd be happy to forward the document that I assembled, with photos. I think to requires a message from my contact info. By the way with the added visibility, I have not changed the color of the rear turns (now turns and running) and frankly, until the man says I have to, I don't really care.
I'd be happy to forward the document that I assembled, with photos. I think to requires a message from my contact info. By the way with the added visibility, I have not changed the color of the rear turns (now turns and running) and frankly, until the man says I have to, I don't really care.
Attachments
-
 261 KB Views: 1,461
Dunc
Discussion starter
30 posts
·
Joined 2011
VT750 Tail light/running light conversion
OK, so here is the word description, I'm not sure how to ad the pics, but if you want the document (with pics) send me a message with your email.
VT750C2 – Taillight conversion – Cost about $11.00 at Pep Boys
Background
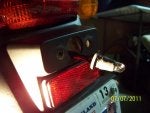
The Honda VT750C2 Shadow comes factory equipped the turn signals front and rear, but only the front fixtures also illuminate as running lights. Described here are the parts and procedure used to convert the rear turn signals to include running lights to match the front fixtures for addition visibility and safety.
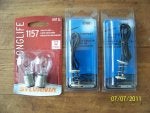
Parts - 2 Pkgs of double contact pigtails # 85801
- 1 Pkg Sylvania double filment taillight bulbs #1157
- 1 pkg butt connectors
Proceedure
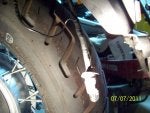
Starting from a standard rear taillight,
remove the amber lens.
Remove the bulb,
remove the two screws holding
the bulb mounting plate and pull
the mounting plate out of the fixture,
as the wire will allow
and fold down out of the way.
Using needle nose pliers, pull the single
contact cap out of its base and cut off
about 1 ¼" followed by attaching one
connector. Remove the round base
from the double contact set. Notice the arrow shows the tab on the top plate of the double contact set.
The rubber plug on the left side of the
Fixture has a center piece that must be
partially pulled out to allow a fish to
come through and get the new wire
through the shaft. I used a miniblind cord
stringer as it is smaller than an electrical
fish. The arrow shows the stringer as it
goes through the space that the wire
comes through to the under fender side
for power. This is a simple wire pull
through the channel.
Once the wire is fished through, connect the short side wire, in the housing, to the butt connector. This reconnects the turn signal power.
Take the double contact wire and spring assembly and
manipulate it into the mounting shaft that housed the
original single contact pigtail. The mounting ring, where the
two contact heads ride, has a tab that must be at the top of
the ring in order to line up correctly with the bulb contacts.
The arrow shows direction that the notch needs to go into
the housing assenbly.
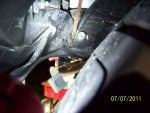
To connect the wires to power, use the license
plate power which is easily accessible under the
fender. Pull the bulb out of the mount for easier
access and splice the two wires to the one side
that delivers power to the light. Determine this
by touching a lead to one side or the other of the plate light bulb socket, with the bulb removed, and
with the key on. Make sure to replace the wire retaining hook and tuck the wires as possible.
The bulb needs to be altered in order to fit the
base, without altering it, to accommodate
the staggered double pin on the bulb shaft. This
is done by filing the upper pin off.
Before and after shown.
Having inserted the wire assembly in the base housing, reverse your original disassembly procedure and
replace the mounting plate and two screws.
Insert the bulb and try the power by turning on the bike's key.
If the brighter of the two filaments is blinking, your fine, if not take the bulb out and reverse the bulb
and the correct filament will light. The brighter of the two should be the turn signal, the lesser should be
the running light. The turn signal relay will drive the signal at a fast rate and not function properly if the
smaller filament is used for this function.
Once it all checks out and works reassemble the lens cover and your done.
OK, so here is the word description, I'm not sure how to ad the pics, but if you want the document (with pics) send me a message with your email.
VT750C2 – Taillight conversion – Cost about $11.00 at Pep Boys
Background
The Honda VT750C2 Shadow comes factory equipped the turn signals front and rear, but only the front fixtures also illuminate as running lights. Described here are the parts and procedure used to convert the rear turn signals to include running lights to match the front fixtures for addition visibility and safety.
Parts - 2 Pkgs of double contact pigtails # 85801
- 1 Pkg Sylvania double filment taillight bulbs #1157
- 1 pkg butt connectors
Proceedure
Starting from a standard rear taillight,
remove the amber lens.
Remove the bulb,
remove the two screws holding
the bulb mounting plate and pull
the mounting plate out of the fixture,
as the wire will allow
and fold down out of the way.
Using needle nose pliers, pull the single
contact cap out of its base and cut off
about 1 ¼" followed by attaching one
connector. Remove the round base
from the double contact set. Notice the arrow shows the tab on the top plate of the double contact set.
The rubber plug on the left side of the
Fixture has a center piece that must be
partially pulled out to allow a fish to
come through and get the new wire
through the shaft. I used a miniblind cord
stringer as it is smaller than an electrical
fish. The arrow shows the stringer as it
goes through the space that the wire
comes through to the under fender side
for power. This is a simple wire pull
through the channel.
Once the wire is fished through, connect the short side wire, in the housing, to the butt connector. This reconnects the turn signal power.
Take the double contact wire and spring assembly and
manipulate it into the mounting shaft that housed the
original single contact pigtail. The mounting ring, where the
two contact heads ride, has a tab that must be at the top of
the ring in order to line up correctly with the bulb contacts.
The arrow shows direction that the notch needs to go into
the housing assenbly.
To connect the wires to power, use the license
plate power which is easily accessible under the
fender. Pull the bulb out of the mount for easier
access and splice the two wires to the one side
that delivers power to the light. Determine this
by touching a lead to one side or the other of the plate light bulb socket, with the bulb removed, and
with the key on. Make sure to replace the wire retaining hook and tuck the wires as possible.
The bulb needs to be altered in order to fit the
base, without altering it, to accommodate
the staggered double pin on the bulb shaft. This
is done by filing the upper pin off.
Before and after shown.
Having inserted the wire assembly in the base housing, reverse your original disassembly procedure and
replace the mounting plate and two screws.
Insert the bulb and try the power by turning on the bike's key.
If the brighter of the two filaments is blinking, your fine, if not take the bulb out and reverse the bulb
and the correct filament will light. The brighter of the two should be the turn signal, the lesser should be
the running light. The turn signal relay will drive the signal at a fast rate and not function properly if the
smaller filament is used for this function.
Once it all checks out and works reassemble the lens cover and your done.
Dunc
Discussion starter
30 posts
·
Joined 2011
SO maybe this will help. These should follow the progression of the preceding post.
Attachments
-
 225.8 KB Views: 584
 -
 136.3 KB Views: 940
 -
 152.4 KB Views: 663
 -
 153.2 KB Views: 475
 -
 155.1 KB Views: 568
 -
 140.8 KB Views: 502
 -
 155.9 KB Views: 512
 -
 158.1 KB Views: 804
 -
 155 KB Views: 499
 -
 261 KB Views: 485
Dunc
Discussion starter
30 posts
·
Joined 2011
14 days and AOK
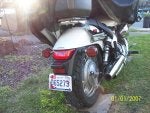
Just an update, it's been 14 days and the wiring conversion has no issues. Has anyone else tried this? I have kept the amber plastic on these turn signals/now running lights and I think I like the visibility better.
Just an update, it's been 14 days and the wiring conversion has no issues. Has anyone else tried this? I have kept the amber plastic on these turn signals/now running lights and I think I like the visibility better.
Attachments
-
 261 KB Views: 538
6,588 posts
·
Joined 2004
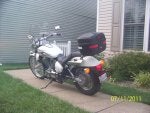
I did it almost the same way, except instead of swapping the bulb sockets, I bought a set of used front turn signals which already have the dual-element bulbs.Just an update, it's been 14 days and the wiring conversion has no issues. Has anyone else tried this? I have kept the amber plastic on these turn signals/now running lights and I think I like the visibility better.
Also, I used a "Hoppy" trailer taillight converter used to connect a four-wire trailer to a five-wire car. The motorcycle is the equivalent of a five-wire system with a 1) right turn signal 2) left turn signal 3) running light 4) brake light 5) ground.
The light bar only has a 1) right turn signal 2) left turn signal 3) running light 4) ground.
With the converter, the turn signals on the rear light bar also act as brake lights.
It was a very easy set up and has been working flawlessly for years.
The only thing is that I had to replace the stock flasher with an electronic one to control the flash rate from flashing too fast............
Phil
This is what the tail lights look like, I made the red lenses by modifying the lenses from trailer marker lights to fit my light bar:
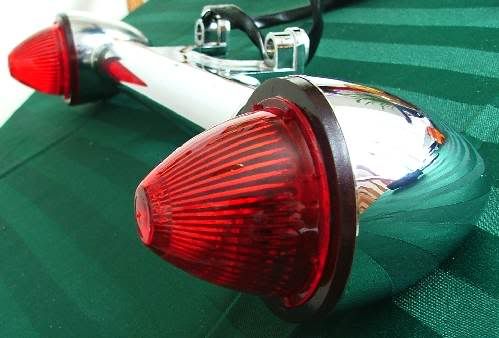

And on the front, I have clear lenses on the turn signals for the retro look:

3,469 posts
·
Joined 2011
somebody suggested to use ruby red dye,to dye the lenses red,im most states its illegal to have amber continuously lite on rear of any motorvehicle,but as you stated,til the man says otherwise..lol..just an idea if he does...also www.motolume.com has red lenses for stock lights for hondas,for most cruisers for 20bucks. nice job on that too btw..ive been wantin to do this for along time now..and have been doin alot of research as to easiest/cheapest ways to do this..however i dont want mine to be lite up real bright on the taillight side of it,so im goin to wire it up with an 1157 dual element bulb/wires on the "low side" so that when the signal light/brake light comes on itll light up on the "high side" to make it brighter. thanks for sharin this. safe riding.
292 posts
·
Joined 2009
Hey, thank you for mentioning this motolume.com. I just ordered replacements for front and rear. What a nice company too. Extremely fast responses over email, nice products, inexpensive AND they come with the bulbs. And yes it's $20 for the pair for front or rear. IMO that's a really good deal. Got a set of clears for the fronts and reds for the rears. Pretty pumped!
Dunc
Discussion starter
30 posts
·
Joined 2011
I tried the high side light up and the result was that the turn signal timer was thrown off and blinked the light at roughly two times the right speed. With this result I simply rotated the bulb 180 degrees and it worked great on the correct filament/signal set up. By the way, I have to set to running lights on low light and turns on high, I do not have brakes on these turn stems, brakes are only on the center original. Still, for $11 including bulbs, it's more visibility. I'm so cheap (Scottish)
3,469 posts
·
Joined 2011
ill play around some with the wiring to see which works best..i may just do the tail/turn instead...did you have to put a little bit bigger fuse in? someone told me to either run heavier wire,or say instead of a 15amp use a 20amp fuse.(just an example)<....to keep from overloading the circuit..idk,,yeah im so cheap too. id really like to have mine as run/turn/brake though,like i said,ill play around some hookin it up to see what works.
Dunc
Discussion starter
30 posts
·
Joined 2011
I don't know that bumping the size of the fuse would be a bad thing at all, but I didn't and am having no issues. When you go with three lights, that may need a bigger fuse and wiring. How expensive could it have been for Honda to have done this on the bikes originally?
3,469 posts
·
Joined 2011
i agree 100%..honda and other metric bikes shouldve made the rear like the front,with multiple taillights/brake lights,i first noticed them on a harley sportster and really liked the way it lit up the back of the bike,it was way more noticible then the other sportster i was riding with that didnt have the tail/turn/brake light combined..and i thought,hmmm..im goin to redo mine, im goin to order the red lenses for mine and then ill rewire it...ill def post pics of b4 and after once i get this done..hopefully within the next cpl weeks.
543 posts
·
Joined 2011
Thats looks like a good add on like Craig says most states if not all you can't use amber for tail light. I think I'll try that on mine.
322 posts
·
Joined 2011
Nice job Dunc. I'll be doing this conversion Saturday when I get my new hardbags. Have to relocate the turn signals anyways so I might as well spend the extra $11 while everything's apart. Thanks for the info !
BTW - Whats a butt connector? ( sounds so dirty. lol ) I don't see it in your pics.
BTW - Whats a butt connector? ( sounds so dirty. lol ) I don't see it in your pics.
4,079 posts
·
Joined 2008
If you look at most state traffic laws, it says in black and white that all vehicles are limited to 2 running lights (marker lights) in the rear. Enforcement may be even more lax today since most new cars have a third marker light usually mounted on the rear windshield.Originally Posted by craig s.
i agree 100%..honda and other metric bikes shouldve made the rear like the front,with multiple taillights/brake lights ....
Dunc
Discussion starter
30 posts
·
Joined 2011
Butt Connector
OK, I get it, actually...the tail light laws call for a third brake/taillight to be mounted in the middle of the car and a certain number of inches off the ground for the express purpose of SEEING THE CAR THAT IS STOPPING in front of the car in front of you. That's what these illegal lights are all about - VISIBILITY. I'm sure that the taxpayers of Maryland will not care about these lights when they realize that they are not paying the Shock-Trauma bill when I don't get hit by some ditsy teenager that can't get off the cellphone. So, when I am stopped (and I probably will be) I'll play dumb, point out the visibility, and consent to changing them. Frankly I'm lit up like a good ole boy's 18 wheeler and like it that way as I do a 1 hour round trip commute at least 5 days a week with most rides at night, rain or shine.
As for the butt connectors, well that was not my call and there are probably better connectors, but it's what I had and they wrap well with tape.
Attachments
-
 195 KB Views: 413
4,079 posts
·
Joined 2008
Dunno about the placement laws, but on the limit of 2 rear running lights, that's so people don't get carried away and add so many extra rear lights that the spectacle becomes a distraction. NHTSA could just as well have arbitrarily set the bar at 4, but they chose 2, with bikes subsumed under the same car regulations. The last I checked, bikes don't possess that large a rear profile to pose the same hazards the regulations were meant to address .... 2 extra rear running lights on a bike makes for a highway hazard?Originally Posted by Dunc
OK, I get it, actually...the tail light laws call for a third brake/taillight to be mounted in the middle of the car and a certain number of inches off the ground for the express purpose of SEEING THE CAR THAT IS STOPPING in front ....
Furthermore, here's where the regulations stumble over each other. Amber rear signals supposedly provide better avoidance collision when merging and of course signaling for the merge. I believe Europe requires rear signals to be amber. US, either red or amber. NHTSA is pushing for amber lens on rear turn signals on all new cars. In that sense, requiring red lens on a bike's rear turn signals, that have been converted to running lights, runs counter to better safety. Since we already have amber lens on the rear turn signals, even stupid, er, arcane.
I've had problems with the insulated type of butt connectors that you used. You may not. The insulation hid faulty crimps. Wriggling a nearby wire caused a loose crimp on an unknown adjacent wire to become looser with less contact, but I couldn't figure out which crimp was faulty because all the crimps were hidden by insulation. To me, bare butt connectors are better. I've even removed the insulation, then wrapped the bare connection with electrical tape. Also, somebody explained that household wire nuts make the best 'handy' connectors. As long as you tape up the pigtails with the wire nut, it ain't going nowhere.As for the butt connectors, well that was not my call and there are probably better connectors, but it's what I had and they wrap well with tape.
before I forget, good job, Dunc.
Dunc
Discussion starter
30 posts
·
Joined 2011
I can understand the trepidation over the bad crimp issue and had I not done it myself, I probably would be concerned, too. I used them mainly because I had decided to connect the running lights to the tag light for power and stringing long the path under the fender (and exposed to much messy stuff). I thought it best to be as low profile as possible. This was a lazy decision, I know, but it seems to be working fine and looks a bit more stock as well. I wrapped the entire new string with electrical tape and rewrapped the length to the tag power line as the connection for power to the running lights in the tag light plug. I chose not to cut the cord under the fender and then wrap it back up.
4,079 posts
·
Joined 2008
My own problem with 'insulated' butt connectors was that the layer of insulation makes it hard to feel and differentiate how much I was crimping the metal part of the butt connector underneath the insulation. That's, the stiffness of the insulation gave a false sense of the tightness of the crimp. Crimping at odd angles on the bike didn't make things easier either. Obviously, might just be with me.
Btw, agreed, it's better to leave well enough alone because you can always, always, retrace your own steps should things stop working down the road. This is even wiser if you've configured the wires, etc., different from the stock setup. Modifying a modification plays havoc on the memory. If the stock setup is in place, you have something to reference off. This is not so with a previously altered setup. People may scoff at this, but it's easy to get your 'lefts' mixed up with your 'rights' on the rear wiring. In one instance, you're facing the front of the bike, then the next instance, you're facing the back of the bike pulling wires, and if you've heaped on converting the rear single-filament to dual-filaments, then you may be so busy focusing on which wire is the high, and which wire belongs to the low, that you lose track of your lefts and rights dyslexic or not, until, like anything else, you eventually develop a better feel for it. I guess you could work on one side signals at a time, but it's more cumbersome.
On 'crimps,' I wish people (in general) would stop being so cavalier with the step on behalf of the less experienced crimpers. If you practice 10 crimps while you're in front of the tv, and tug on the crimps the next morning, about half the crimps will pull off. That's working on a flat surface. On the bike you're crimping at odd angles and vibrations tend to exacerbate defects that wouldn't even pose a problem on home electronic equipment. In that sense, crimping is a skill in itself. Nowadays I simply solder any joints and shrink wrap it. I even add a layer of sheathing over the shrink wrap tubing. No, plasitc sheathing and shrink tubing are not the same items. By the time I'm through, a 14 gauge wire ends up an inch in diameter. That's not including a layer of electrical tape if I'm up to it. If you plan later on running wires under the rear fender, I think the better thing to do is sheath the wires. There are pre-wired sheathing or you could fish wires through empty sheathing.
Dunc
Discussion starter
30 posts
·
Joined 2011
Taillight lens options
To follow up on the amber rear taillight issue, if I were to pursue changing the rear turns/now turn and running lights, I could use ideas as to options. Replacement options if they are made, paint, surgery, tape...I'm open to anything reasonable.
To follow up on the amber rear taillight issue, if I were to pursue changing the rear turns/now turn and running lights, I could use ideas as to options. Replacement options if they are made, paint, surgery, tape...I'm open to anything reasonable.
Attachments
-
 147.5 KB Views: 630
1,203 posts
·
Joined 2011
Since I couldn’t find red lenses and I’m not really interested in buying and mounting a new set of rear lights. I used Testors paint. It’s a transparent candy apple red # 1605 and can be found at any hobby lobby in the model section or on line. I put three coats on the inside of the lens and one on the outside. I was happy with the results.To follow up on the amber rear taillight issue, if I were to pursue changing the rear turns/now turn and running lights, I could use ideas as to options. Replacement options if they are made, paint, surgery, tape...I'm open to anything reasonable.

Dunc
Discussion starter
30 posts
·
Joined 2011
Legal again...red tail lights
OK, well I've gone and done it now...I got the tail light lenses from Phat Performance and I'm legal. So I guess this completes the conversion from stock amber to legal red. If anyone is interested the link can be found at the Phat site and search for "clear alternatives red and go down the list to your model.
OK, well I've gone and done it now...I got the tail light lenses from Phat Performance and I'm legal. So I guess this completes the conversion from stock amber to legal red. If anyone is interested the link can be found at the Phat site and search for "clear alternatives red and go down the list to your model.
Attachments
-
 314.5 KB Views: 559
 -
 261 KB Views: 311
Dunc
Discussion starter
30 posts
·
Joined 2011
Well, since my original post about 1 year ago, the tail lights are still working fine and no issues with electrical power, shorting, crimping, frying or legalities. Looks to be a solid $26 conversion including all parts. Thought you'd want to know.
53 posts
·
Joined 2011
I came across this today and immediately went out to auto zone and got what I needed. I already swapped out to L.E.D.'s last year and this mod was the icing on the cake! 25 bucks ( 16$ for the double pole red leds) and I'm a happy camper. Thanks for sharing ")
-
?
-
?
-
?
-
?
-
?
-
?
-
?
-
?
-
?
-
?
-
?
-
?
-
?
-
?
-
?
-
?
-
?
-
?
-
?
-
?
- posts
- 1.6M
- members
- 91K
- Since
- 2007
Welcome to Honda Shadow Forum. Come in and discuss any Honda Shadow models: VT1100, VT250, VT750 and the VT500.
Top Contributors this Month
View All
swifty2014
285 Replies
"Captain D"
118 Replies
h13man
103 Replies